


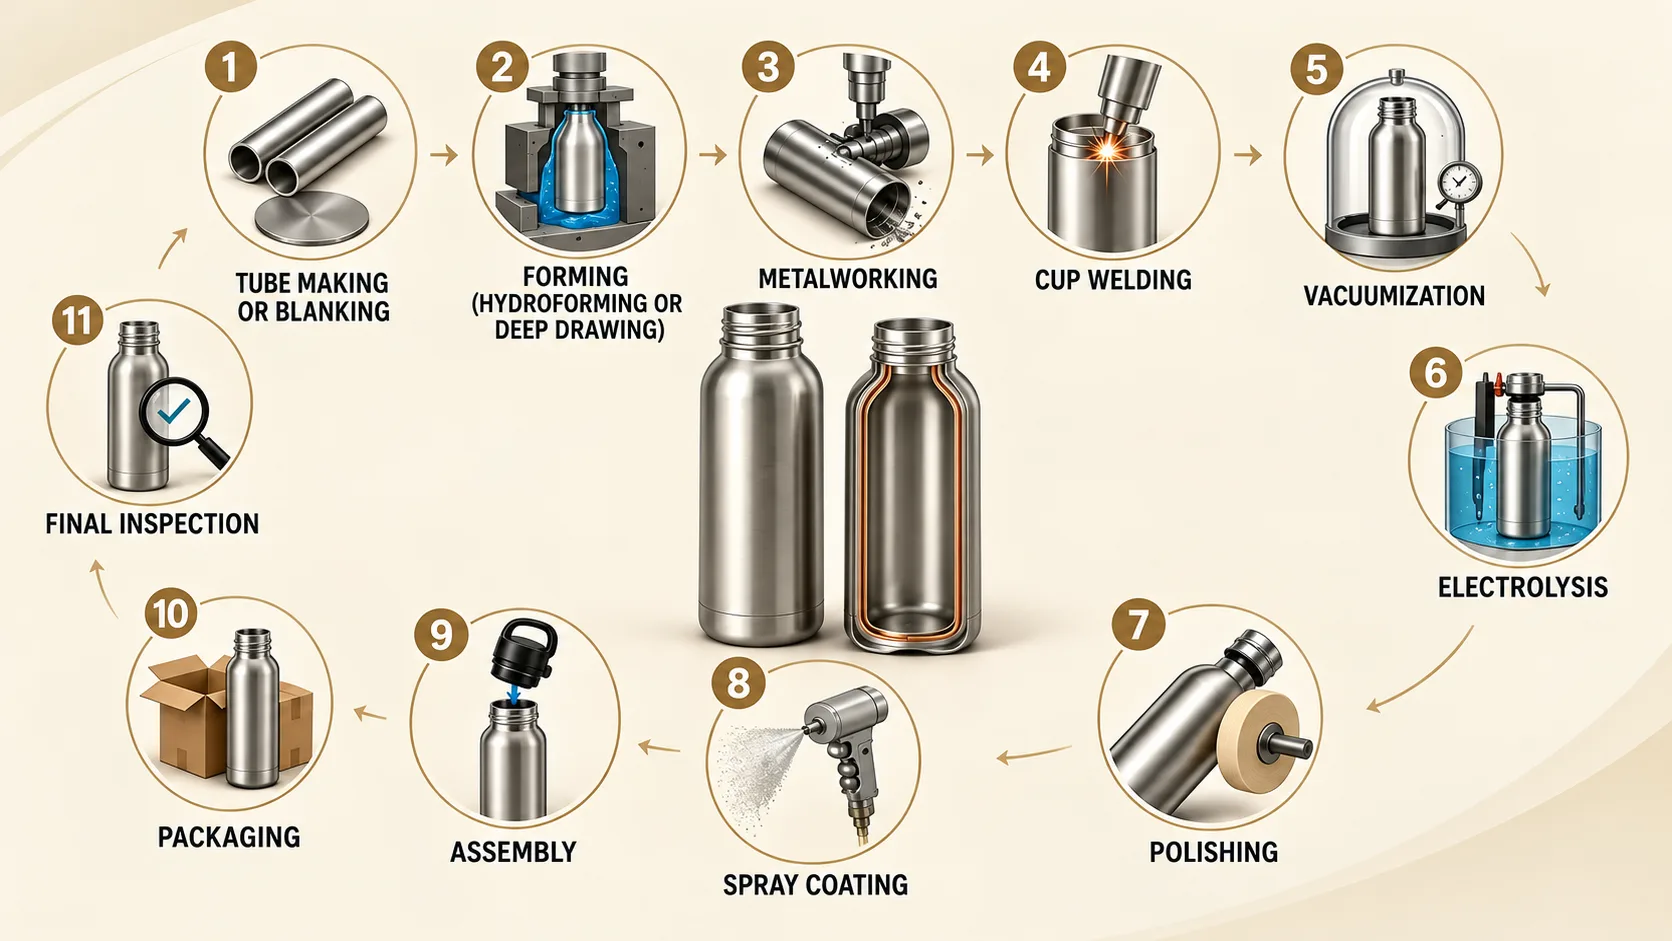
A stainless steel insulated bottle may look like a simple product, but making one involves several processes that must work together. The steel needs to be formed into the right shape, the inner and outer walls must be joined, and the space between them must be evacuated to create the vacuum insulation layer. Surface finishing, assembly and quality inspection then bring the bottle to its finished state. The exact manufacturing process depends on the bottle's design and how its metal components are formed. Understanding these steps helps brands and buyers see why product shape, construction, appearance and performance all depend on decisions made during manufacturing.
1. Forming the Stainless Steel Components
Manufacturing begins with stainless steel, which is prepared and formed into the inner liner and outer shell of the bottle. Two common approaches are tube forming and deep drawing. In tube forming, stainless steel is first made into tubes, which are then shaped to achieve the required bottle profile. Hydroforming may be used to expand and shape the tubes. Depending on the construction, the inner liner may retain a visible straight welding seam. Deep drawing starts with flat, round stainless steel blanks. Presses form the blanks into the required cup-shaped components through a series of forming operations. The resulting inner liner does not have the same visible straight seam associated with a tube-based construction.
The suitable route depends on the required geometry, tooling, material use and production requirements. For brands developing a new product, these factors can affect which designs are practical to manufacture at the required volume and consistency.
2. Shaping and Welding the Bottle Body
After initial forming, the metal components undergo further processing to achieve the required dimensions and fit. Operations may include trimming, shaping and forming the openings or other features needed for assembly. The inner liner and outer shell are then joined at the designated sections to create the double-wall structure. The space between the two walls will later become the vacuum cavity.
This stage is important because the components must fit together correctly and the joints must support the subsequent vacuum process. Dimensional variation or welding defects can create problems in later production, making forming accuracy and joint quality essential to a reliable finished bottle.
3. Creating the Vacuum Insulation Layer
The defining step in making a vacuum-insulated bottle is removing air from the space between its inner and outer walls. After the structure is prepared for vacuum processing, air is extracted from the interlayer. The cavity is then sealed to establish the vacuum. With very little gas remaining between the walls, heat transfer through gas conduction and convection is greatly reduced.
The vacuum layer is central to the bottle's insulation performance, but it is not the only factor involved. The bottle's shape, neck and base construction, lid and overall manufacturing quality also influence how well it maintains beverage temperature. The finished product needs appropriate testing to verify that it meets the required temperature-retention specifications.
4. Treating and Finishing the Surfaces
Once the bottle body has been formed and the required structural processes are complete, surface treatments help prepare it for use and achieve the specified appearance. The inner liner may undergo electrochemical surface treatment, depending on the product requirements. This helps establish the required interior surface condition. The outside of the bottle may then be polished to achieve a smooth or reflective finish and prepare it for subsequent decoration.
If the design calls for a colored exterior, spray coating can be used to apply the specified finish. Other surface treatments may be selected according to the product design and intended appearance. These processes affect more than aesthetics. The finish determines how the product looks and feels, while process consistency influences whether the surface remains uniform across a production batch. Before mass production, the specified color, texture and appearance should be confirmed against an approved sample.
5. Assembling the Lid and Other Components
A bottle body is only one part of the finished product. Depending on the design, the bottle may need a lid, seal, handle, carrying loop or other accessories.
During assembly, these components are fitted to the bottle and checked for correct fit and function. For products with lids, the opening mechanism, seal and ease of cleaning are important considerations. A lid designed to reduce splashing should not automatically be treated as leakproof; that performance needs to be confirmed separately when required. For OEM projects, component compatibility matters as much as the appearance of each individual part. The lid, body and accessories need to work as one product and meet the agreed specifications.
6. Inspecting and Packing the Finished Bottles
Before shipment, finished bottles undergo inspection to check that they meet the product requirements. Depending on the specification, checks may cover dimensions, surface defects, coating consistency, component fit and other functional requirements. Insulated bottles also need appropriate performance verification. Vacuum integrity and temperature-retention performance cannot be established by appearance alone, so relevant tests should be defined according to the product's intended use and performance claims.
Once the products pass the required checks, they are packed according to the agreed packaging configuration. Packaging must protect the finish and components during storage and transportation, while retail or gift packaging may also need to meet presentation requirements.
What the Manufacturing Process Means for Your Bottle Design
The manufacturing route influences how a bottle can be shaped, assembled and finished. A design that looks straightforward on screen may require particular forming operations, tooling or changes to the component structure before it can be produced consistently. For brands working on OEM or ODM drinkware, it is useful to confirm the intended capacity, dimensions, wall construction, lid design, surface finish and performance requirements early in development. These details help the manufacturer evaluate the design, prepare samples and identify any production considerations before a bulk order is placed.
At Ansune, stainless steel insulated bottles are produced through forming, metalworking, welding, vacuum processing, surface treatment, assembly and inspection. The exact route depends on the selected product design and manufacturing requirements. Understanding how the bottle is made provides a clearer starting point for developing a product that meets both customer expectations and production requirements.